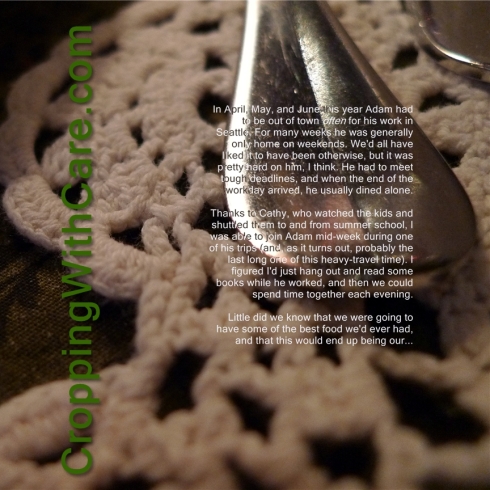
This is the title page in my most recent StoryBook (edited slightly for public web access). If you look closely at the paragraphs written, you’ll see there are actually two colors in the text. I really wanted the photograph to show through, and even creating digital “vellum” as a backdrop for black text covered up the photo too much for my taste.
I tried everything I could think of to make the text legible on top of this fork and its shine. Dark colors got lost in the fork and most light colors, other than white, looked too bright for the photo. White itself got lost in the shine. I even tried using all-white text and just changing the letters over the shine to black. In that case, the text ended up wrapping differently and wouldn’t stay put. That’s when I got the idea to make it stay put. In StoryBook Creator Plus, I changed the white text box to a plain-old embellishment by “flattening” it.* Then I used the custom cutting tool to slice the parts of the text that were over the shine. I changed those slices to black, selected all the white and black pieces, and flattened them together again. To keep it lined up properly with the photo background, I then locked this new “embellishment” in the elements panel.
Here I’ve put a yellow rectangle behind the opening paragraphs so that it’s a bit clearer where the white and black pieces are!
Most people, even experienced digital scrapbookers, don’t even notice the two colors when they look at my completed album. Now that’s the subtlety I was looking for! The photo does show through unencumbered.
If you’ve got a story to tell and a photograph you want to backdrop it, and if parts of the text are getting lost on your photo, give this technique a try!
*Before I flatten a text box which would take a bit of typing to re-create, I copy it, paste it, and hide the newly-pasted text, pretending it’s no longer there as I finish the rest of my page. If I later find that there is a spelling error or other change to be made, I can bring the original text box back and edit it rather than typing it all over again.
© Carolyn Gordon and Cropping with Care, 2009. Unauthorized use and/or duplication of this material without express and written permission from Carolyn Gordon is strictly prohibited. Excerpts and links may be used, provided that full and clear credit is given to Carolyn Gordon and Cropping with Care with appropriate and specific direction to the original content. Carolyn Gordon is an independent consultant and the opinions and content on this site are not necessarily endorsed by Creative Memories. StoryBook and StoryBook Creator Plus are trademarks of Creative Memories.


Brilliant! I am going to try that technique!
Glad you like it!